Lingbot VLA 模型
lingbot-vla 是基于 Pi0 架构 和 Qwen 系列的 VL 大模型实现的 VLA 基础模型.
它经过 20,000 小时的真实世界数据的预训练, 是我国十分优秀的 VLA 基础模型.
什么是 VLA
V(视觉)就是"当前时刻摄像头拍摄到的画面" A(动作)就是"根据当前时刻的画面推理出的, 机械臂各个关节的目标位置信息" L(语言)就是"你希望机械臂完成的任务"
基于视觉和语言来理解场景和指令, 然后输出动作. 这就是 VLA 模型.
VLA 中的 L
传统的 VA 模型(比如 ACT), 更像是一种视觉-动作的神经反射. 而基于 VL(视觉-语言) 大模型, 视觉和语言可以作为输入, 使 VLA 模型可以理解当前场景和指令, 从而输出相应的动作.
本次目标
将绿色方块放到纸盒里
我们期望机械臂能够根据视觉来自主完成这个任务.
本次目标只是为了跑通流程. 所以看上去和传统的 VA 模型行为并无差别. 更进一步的, 你可以将多个任务加入训练. 比如追加一个任务: 将绿色方块从纸盒里拿出来.
这样, 理论上你就可以达到这个效果:
通过语音下达指令: 将绿色方块放到纸盒里. 等待该任务完成后, 再通过语音下达指令: 将绿色方块从纸盒里拿出来.
制作数据集
首先你需要拥有一款机械臂, 你需要通过遥操作的方式完成特定任务的示例操作, 并记录该过程的视频与对应该视频每一帧的机械臂动作信息. 通常你需要完成多次, 示例操作覆盖的越是全面, 模型根据示例操作训练而来的效果就越好.
搭建 LeRobot 环境
我们选用 SO-100 作为本次实验的机械臂. (SO-101 是 SO-100 的 优化版本, 软件兼容且成本相同. 新玩家请直接上手 SO-101)
对于 SO-100 机械臂来说, 使用 LeRobot 进行数据采集是最便捷的方式.
请参考官方文档 https://huggingface.co/docs/lerobot/installation 进行 LeRobot 的环境搭建.
下面是我使用 uv 搭建环境的过程, 供大家参考:
- 安装 ffmpeg
sudo apt update
sudo apt install ffmpeg
- 从源代码安装 LeRobot
git clone https://github.com/huggingface/lerobot.git
cd lerobot
uv sync --extra feetech
机械臂的 组装, 初始化, 标定
具体请参考官方文档:
遥操作
我们需要通过遥操作来确认机械臂是否能够正常工作. 并观察摄像头的视角是否符合预期.
执行下列命令开始遥操作:
lerobot-teleoperate \
    --robot.type=so100_follower \
    --robot.port=/dev/ttyACM0 \
    --robot.id=so100_follower_arm \
    --robot.cameras="{ \
        camera_top: {type: opencv, index_or_path: 0, width: 640, height: 480, fps: 30}, \
        camera_wrist_left: {type: opencv, index_or_path: 2, width: 640, height: 480, fps: 30}, \
        camera_wrist_right: {type: opencv, index_or_path: 4, width: 640, height: 480, fps: 30}, \
    }" \
    --teleop.type=so100_leader \
    --teleop.port=/dev/ttyACM1 \
    --teleop.id=so100_leader_arm \
    --display_data=true
以下是各个参数的具体含义:
--robot.type: lerobot 支持的机器人类型, 目前来说, 可以简单理解成机械臂类型. 参考
src/lerobot/robots目录, 可以知道 LeRobot 目前支持哪些机器人. 参考 具体机器人目录下的config_{robot}.py文件 可以知道具体的 robot.type 例如src/lerobot/robots/so_follower/config_so_follower.py中的内容如下: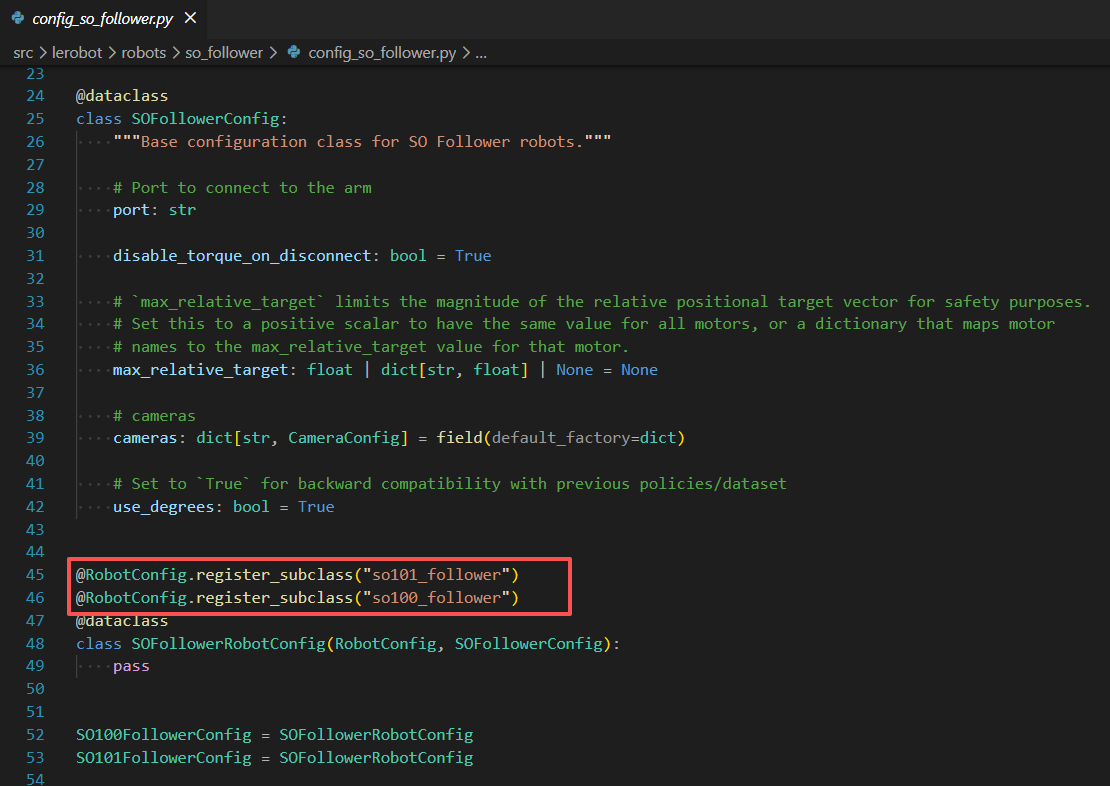
--robot.port: 机器人在你电脑上的端口. 对我们而言就是机械臂连接到电脑上后显示的USB设备端口. 先将机械臂的 USB 接口连接到电脑, 再执行
lerobot-find-port, 然后根据提示拔出 USB 后 按回车键. 这样就可以知道该机械臂的 robot.port了. 示例输出如下:Finding all available ports for the MotorBus. ['/dev/tty.usbmodem575E0032081', '/dev/tty.usbmodem575E0031751'] Remove the USB cable from your MotorsBus and press Enter when done. [...Disconnect corresponding leader or follower arm and press Enter...] The port of this MotorsBus is /dev/tty.usbmodem575E0032081 Reconnect the USB cable.--robot.id: 机械臂的唯一 ID. 考虑多个机械臂的情况, 框架使用此参数进行进行区分.
robot.cameras: 配置这个机械臂的摄像头. 使用
lerobot-find-cameras opencv来查看你的摄像头信息, 示例输出如下:
    --- Detected Cameras ---
    Camera #0:
    Name: OpenCV Camera @ 0
    Type: OpenCV
    Id: 0
    Backend api: AVFOUNDATION
    Default stream profile:
        Format: 16.0
        Width: 1920
        Height: 1080
        Fps: 15.0
    --------------------
    (more cameras ...)
数据采集
执行下列命令开始数据采集:
lerobot-record \
    --robot.type=so100_follower \
    --robot.port=/dev/ttyACM0 \
    --robot.id=so100_follower_arm \
    --robot.cameras="{ \
        camera_top: {type: opencv, index_or_path: 0, width: 640, height: 480, fps: 30}, \
        camera_wrist_left: {type: opencv, index_or_path: 2, width: 640, height: 480, fps: 30}, \
        camera_wrist_right: {type: opencv, index_or_path: 4, width: 640, height: 480, fps: 30}, \
    }" \
    --teleop.type=so100_leader \
    --teleop.port=/dev/ttyACM1 \
    --teleop.id=so100_leader_arm \
    --display_data=true \
    --dataset.repo_id=hexchip/record-test \
    --dataset.num_episodes=5 \
    --dataset.single_task="将绿色方块放到纸盒里" \
    --dataset.streaming_encoding=true \
    --dataset.encoder_threads=2
训练模型
这里假设我们使用两张 Nvidia 的 48GB 的显卡进行训练. 我们需要先搭建 lingbot-vla 所需的训练环境. 你的机器需要已经装好显卡驱动.
搭建训练环境
执行下列命令即可创建并激活虚拟环境:
conda create -n lingbotvla python=3.12 -y
conda activate lingbotvla

git clone https://github.com/Robbyant/lingbot-vla.git
cd lingbot-vla
bash install.sh
期间会构建 flash-attn==2.8.3, 需要很长时间. 你可以直接从 https://github.com/Dao-AILab/flash-attention/releases/tag/v2.8.3 下载预构建包自行安装.
添加训练所需的配置文件
参考
configs/robot_configs/robotwin.yaml创建 SO-100 的机械臂配置configs/robot_configs/so100.yaml:states: - observation.state.arm.position: origin_keys: - observation.state: start: 0 end: 5 - observation.state.effector.position: origin_keys: - observation.state: start: 5 end: 6 actions: - action.arm.position: origin_keys: - action: start: 0 end: 5 subtract_state: True - action.effector.position: origin_keys: - action: start: 5 end: 6 subtract_state: False images: - observation.images.camera_top - observation.images.camera_wrist_left - observation.images.camera_wrist_right参考
configs/vla/real_load20000h.yaml创建 SO-100 的训练配置configs/vla/so100.yaml: 关于训练配置的更多信息请参考 Training_Config.mdmodel: model_path: robbyant/lingbot-vla-4b tokenizer_path: Qwen/Qwen2.5-VL-3B-Instruct data: datasets_type: vla data_name: so100 train_path: /mnt/data/datasets joints: - arm.position: 6 - effector.position: 1 cameras: - camera_top - camera_wrist_left - camera_wrist_right num_workers: 8 norm_type: meanstd norm_stats_file: assets/norm_stats/so100_demo.json train: output_dir: "output/" data_parallel_mode: fsdp2 enable_full_shard: false module_fsdp_enable: true use_compile: true rmpad: false rmpad_with_pos_ids: false ulysses_parallel_size: 1 freeze_vision_encoder: false tokenizer_max_length: 72 max_action_dim: 75 max_state_dim: 75 lr: 5.0e-5 lr_decay_style: constant micro_batch_size: 2 gradient_accumulation_steps: 16 # global_batch_size = micro_batch_size * gradient_accumulation_steps * 8 = 256 when we train with 8 GPUs max_steps: 1024 ckpt_manager: dcp save_steps: 512 save_epochs: 0 enable_fp32: true # Control the precision of the action expert enable_resume: true生成归一化统计量文件
CUDA_VISIBLE_DEVICES=0 bash train.sh scripts/compute_norm.py ./configs/vla/so100.yaml \
    --data.data_name so100 \
    --data.train_path ~/.cache/huggingface/lerobot/hexchip/record-test \
    --data.norm_stats_file assets/norm_stats/so100_record_test.json
开始训练
- 下载训练所需的模型权重
hf download robbyant/lingbot-vla-4b
hf download Qwen/Qwen2.5-VL-3B-Instruct
hf download Ruicheng/moge-2-vitb-normal
- 执行训练脚本
bash train.sh tasks/vla/train_lingbotvla.py ./configs/vla/so100.yaml \
    --data.train_path ~/.cache/huggingface/lerobot/hexchip/record-test \
    --data.data_name so100 \
    --data.norm_stats_file assets/norm_stats/so100_record_test.json \
    --train.output_dir output/
部署模型
执行下列命令:
python -m deploy.lingbot_vla_policy \
 --model_path output/checkpoints/global_step_1024/hf_ckpt \
 --use_compile \
 --use_length 16 \
驱动机械臂
现在可以回到一开始我们搭建的 lerobot 开发环境.
你需要安装额外两个依赖:
uv pip install websockets msgpack
然后复制下面代码, 新建一个 test.py 文件并执行:
import logging
import time
from typing import Dict, Optional, Tuple

from typing_extensions import override
import websockets.sync.client

import functools
import msgpack
import numpy as np

from typing import Optional
from lerobot.cameras.opencv.configuration_opencv import OpenCVCameraConfig
from lerobot.robots.so_follower import SO100Follower, SO100FollowerConfig

def pack_array(obj):
    if (isinstance(obj, (np.ndarray, np.generic))) and obj.dtype.kind in ("V", "O", "c"):
        raise ValueError(f"Unsupported dtype: {obj.dtype}")

    if isinstance(obj, np.ndarray):
        return {
            b"__ndarray__": True,
            b"data": obj.tobytes(),
            b"dtype": obj.dtype.str,
            b"shape": obj.shape,
        }

    if isinstance(obj, np.generic):
        return {
            b"__npgeneric__": True,
            b"data": obj.item(),
            b"dtype": obj.dtype.str,
        }

    return obj


def unpack_array(obj):
    if b"__ndarray__" in obj:
        return np.ndarray(buffer=obj[b"data"], dtype=np.dtype(obj[b"dtype"]), shape=obj[b"shape"])

    if b"__npgeneric__" in obj:
        return np.dtype(obj[b"dtype"]).type(obj[b"data"])

    return obj


Packer = functools.partial(msgpack.Packer, default=pack_array)
packb = functools.partial(msgpack.packb, default=pack_array)

Unpacker = functools.partial(msgpack.Unpacker, object_hook=unpack_array)
unpackb = functools.partial(msgpack.unpackb, object_hook=unpack_array)


from PIL import Image

def convert_to_uint8(img: np.ndarray) -> np.ndarray:
    """Converts an image to uint8 if it is a float image.

    This is important for reducing the size of the image when sending it over the network.
    """
    if np.issubdtype(img.dtype, np.floating):
        img = (255 * img).astype(np.uint8)
    return img


def resize_with_pad(images: np.ndarray, height: int, width: int, method=Image.BILINEAR) -> np.ndarray:
    """Replicates tf.image.resize_with_pad for multiple images using PIL. Resizes a batch of images to a target height.

    Args:
        images: A batch of images in [..., height, width, channel] format.
        height: The target height of the image.
        width: The target width of the image.
        method: The interpolation method to use. Default is bilinear.

    Returns:
        The resized images in [..., height, width, channel].
    """
    # If the images are already the correct size, return them as is.
    if images.shape[-3:-1] == (height, width):
        return images

    original_shape = images.shape

    images = images.reshape(-1, *original_shape[-3:])
    resized = np.stack([_resize_with_pad_pil(Image.fromarray(im), height, width, method=method) for im in images])
    return resized.reshape(*original_shape[:-3], *resized.shape[-3:])


def _resize_with_pad_pil(image: Image.Image, height: int, width: int, method: int) -> Image.Image:
    """Replicates tf.image.resize_with_pad for one image using PIL. Resizes an image to a target height and
    width without distortion by padding with zeros.

    Unlike the jax version, note that PIL uses [width, height, channel] ordering instead of [batch, h, w, c].
    """
    cur_width, cur_height = image.size
    if cur_width == width and cur_height == height:
        return image  # No need to resize if the image is already the correct size.

    ratio = max(cur_width / width, cur_height / height)
    resized_height = int(cur_height / ratio)
    resized_width = int(cur_width / ratio)
    resized_image = image.resize((resized_width, resized_height), resample=method)

    zero_image = Image.new(resized_image.mode, (width, height), 0)
    pad_height = max(0, int((height - resized_height) / 2))
    pad_width = max(0, int((width - resized_width) / 2))
    zero_image.paste(resized_image, (pad_width, pad_height))
    assert zero_image.size == (width, height)
    return zero_image


FPS = 30

TASK = "Grab the black cube"

ACTION_KEY_MAP = [
    'shoulder_pan.pos',
    'shoulder_lift.pos',
    'elbow_flex.pos',
    'wrist_flex.pos',
    'wrist_roll.pos',
    'gripper.pos'
]

def so100_to_lingbot(obs: dict, task: Optional[str] = None) -> dict:
    vla_input = {}

    # ── 1. 图像:重命名为 yaml 中定义的完整路径 ──────────────────
    image_map = {
        "camera_top":         "observation.images.camera_top",
        "camera_wrist_left":  "observation.images.camera_wrist_left",
        "camera_wrist_right": "observation.images.camera_wrist_right",
    }
    for raw_key, vla_key in image_map.items():
        if raw_key in obs:
            img = obs[raw_key]
            assert img.dtype == np.uint8, f"{raw_key}: 必须是 uint8,当前 {img.dtype}"
            assert img.shape[-1] == 3,  f"{raw_key}: 必须是 RGB,当前 shape {img.shape}"
            vla_input[vla_key] = img

    # ── 2. 状态:构建 6 维向量(5 臂关节 + 1 夹爪)───────────────
    # 顺序必须与 yaml 中的 start:end 严格一致
    motor_keys = [
        'shoulder_pan.pos',   # index 0  → arm.position[0]
        'shoulder_lift.pos',  # index 1  → arm.position[1]
        'elbow_flex.pos',     # index 2  → arm.position[2]
        'wrist_flex.pos',     # index 3  → arm.position[3]
        'wrist_roll.pos',     # index 4  → arm.position[4]
        'gripper.pos',        # index 5  → effector.position[0]
    ]

    state_vec = np.array([obs[k] for k in motor_keys], dtype=np.float32)

    vla_input["observation.state"] = state_vec

    # ── 3. 语言指令 ──────────────────────────────────────────────
    if task is not None:
        vla_input["task"] = task

    return vla_input

def send_vla_action(robot, action_vec: np.ndarray):
    """
    将 LingBotVLA 输出的 6 维绝对位置发送给 SO-100。

    Args:
        robot: SO100Follower 实例
        action_vec: (6,) float32 或 float64,来自 action_chunk['action'][0]
    """
    assert action_vec.shape == (6,), f"动作维度必须是 (6,),当前 {action_vec.shape}"

    print(f"action_vec = {action_vec}")

    # 1. 向量 → 字典(SO100Follower 的 send_action 期望字典格式)
    action_dict = {
        name: float(action_vec[i])  # 确保是 Python float,非 numpy scalar
        for i, name in enumerate(ACTION_KEY_MAP)
    }

    # 2. 发送(SO100Follower 内部会处理为 Dynamixel 协议)
    robot.send_action(action_dict)

class WebsocketClientPolicy:
    """Implements the Policy interface by communicating with a server over websocket.

    See WebsocketPolicyServer for a corresponding server implementation.
    """

    def __init__(self, host: str = "0.0.0.0", port: Optional[int] = None, api_key: Optional[str] = None) -> None:
        self._uri = f"ws://{host}"
        if port is not None:
            self._uri += f":{port}"
        self._packer = Packer()
        self._api_key = api_key
        self._ws, self._server_metadata = self._wait_for_server()

    def get_server_metadata(self) -> Dict:
        return self._server_metadata

    def _wait_for_server(self) -> Tuple[websockets.sync.client.ClientConnection, Dict]:
        logging.info(f"Waiting for server at {self._uri}...")
        while True:
            try:
                headers = {"Authorization": f"Api-Key {self._api_key}"} if self._api_key else None
                conn = websockets.sync.client.connect(
                    self._uri, compression=None, max_size=None, additional_headers=headers
                )
                metadata = unpackb(conn.recv())
                return conn, metadata
            except ConnectionRefusedError:
                logging.info("Still waiting for server...")
                time.sleep(5)

    @override
    def infer(self, obs: Dict) -> Dict:  # noqa: UP006
        data = self._packer.pack(obs)
        self._ws.send(data)
        response = self._ws.recv()
        if isinstance(response, str):
            # we're expecting bytes; if the server sends a string, it's an error.
            raise RuntimeError(f"Error in inference server:\n{response}")
        return unpackb(response)

    @override
    def reset(self, robo_name: str) -> None:
        self.infer(dict(reset=True, robo_name=robo_name))

if __name__ == "__main__":
    # Create robot configuration
    robot_config = SO100FollowerConfig(
        id="arm_follower",
        cameras={
            "camera_top": OpenCVCameraConfig(index_or_path=0, width=640, height=480, fps=FPS),
            "camera_wrist_left": OpenCVCameraConfig(index_or_path=2, width=640, height=480, fps=FPS),
            "camera_wrist_right": OpenCVCameraConfig(index_or_path=4, width=640, height=480, fps=FPS)
        },
        port="/dev/ttyACM1",
    )

    robot = SO100Follower(robot_config)

    robot.connect()

    policy_on_device = WebsocketClientPolicy(host= '47.98.122.182', port=8006)

    # policy_on_device.reset("so100")

    try:

        for step in range(300):

            raw_obs = robot.get_observation()

            obs = so100_to_lingbot(raw_obs, task=TASK)

            action_chunk = policy_on_device.infer(obs)

            print(f"action_chunk server_timing = {action_chunk['server_timing']}")

            for action in action_chunk['action']:
                send_vla_action(robot, action)
                time.sleep(1.0 / FPS)  # 30Hz 执行,但每 16 步才更新一次观测

    except KeyboardInterrupt:
        print("检测到 Ctrl+C,正在终止...")
    finally:
        robot.disconnect()